the Milky Way
The Milky Way is the galaxy which contains our Solar System, which contains the planet we live on, Earth. It contains several billion stars and is visible from Earth as a glowing band arching across the sky from north to south. As the earth rotates, the Milky Way appears to move through the night from east to west.
It may not be visible from urban areas due to light pollution from street lamps, car headlights, buildings, homes, etc… However, escape to a remote area during a night with clear skies and less than a full moon, and you will catch a magnificent view.

Thousand Island Lake, 20.0 sec @ f/2.8, ISO 8000
To photograph the Milky Way, you will need
- a camera with manual settings
- a wide angle lens in the 16-35mm range
- a sturdy tripod
The two photographs below were captured at different settings. These can be used for reference, but the actual settings for any particular moment will depend on various factors:
- ambient light conditions (towns, moon, sun)
- camera ISO range and sensitivity
- lens focal length
- distance between camera and foreground of interest
The first photograph below was shot on the north rim of Yosemite Valley across from Half Dome. The direction is looking south-southwest. Notice the yellow band of light above the horizon. This light is from the Central Valley and is reflected off the clouds in the sky. Light such as this will affect the color in your photograph and the camera settings.
Yosemite, 20.0 sec @ f/2.8, ISO 3200
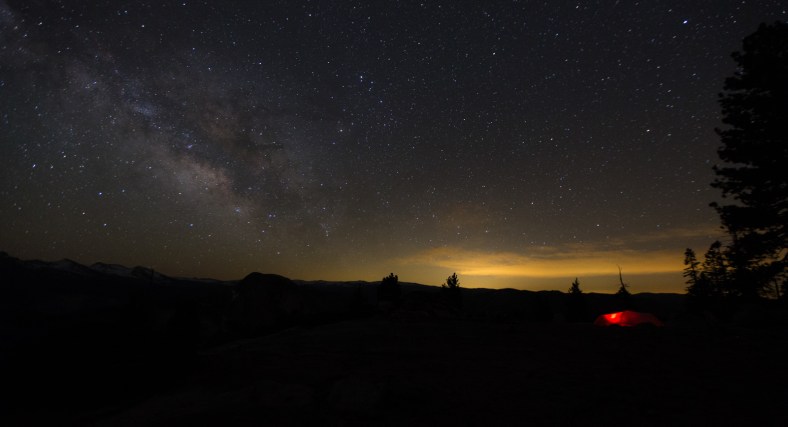
This second photograph was captured in Ancient Bristlecone Pine Forest east of Bishop, CA. There are a few towns along Owens Valley about 10 miles over the hills. Some light is visible on the horizon in the center of the image.

Ancient Bristlecone Pine Forest, 10.0 sec @ f/4.0, ISO 12800
taking the shot
These are the general steps I tend to follow when photographing the Milky Way. Other sources exist for technical details on photography.
- select manual focus, and focus on infinity
- select the highest ISO (25600 on my camera)
- set the exposure to 3 seconds
This provides me with a quick view of the composed frame which I can review on the LCD. If necessary, I adjust the focal length and camera orientation and snap another shot. I repeat this until I obtain the desired composition. After that,
- increase the exposure to 20 seconds, for example
- reduce the ISO to compensate for the increased time exposure
- set the shutter delay to 2 seconds to minimize vibration when pressing the shutter button to take the shot
- take the shot
post-processing
Depending on the lens and focal length selected, there may be distortion at the corners and edges of the captured image. I will crop the the photo to remove this distortion. I will also crop the image to obtain an aspect ratio, other than the standard 3:4, which will work better with the scene.
I will also adjust the color to achieve the mood I want to portray in the photograph.
parting thoughts
You will need to do some planning in advance to find a location of interest and knowing where and when the Milky Way will be in the sky, whether the moon will be above the horizon and how it will affect the view of the night sky, etc… There is no substitute for learning other than practicing and experimenting on your own. Review the photographs above, and use the camera settings as a reference for practicing. Have fun!
